1. Create DNS Records
In order to remotely filter your devices, must create two records in your DNS:
- A record (host record) pointing at the internal IP address of your Cipafilter instance.
- A record pointing at the public facing IP address of your Cipafilter instance (or to the public IP address you are forwarding traffic from). This will allow your devices to proxy via a hostname, which is important as it allows for a seamless transition between intranet and internet.
Important: The hostname you setup in DNS must be different than the hostname set on the IP Settings page of the Cipafilter.
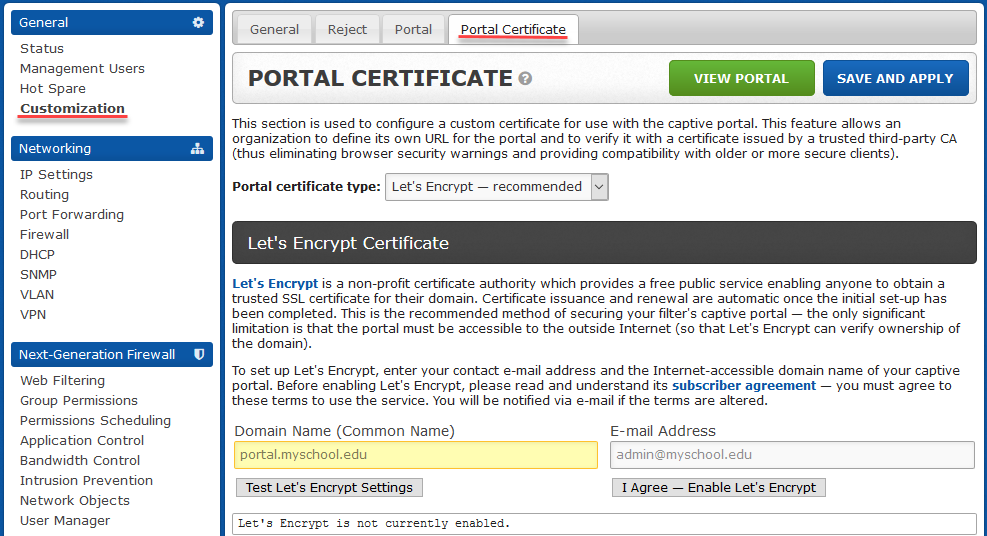
2. Import SSL Certificate
Once your DNS records are in place, you will need a SSL certificate that has been setup for the hostname. This certificate will need to be imported into the Cipafilter. If you prefer, you can opt to use our Let's Encrypt integration which will generate a SSL certificate for free, renew itself every 90 days, and require no management.
- Open Cipafilter and go to Customization > Portal Certificate.
- Generate the Let's Encrypt certificate OR
Generate a Certificate Singing Request (CSR) and upload the files for your SSL cert.
Important: If you have a wildcard certificate for your domain, you will need to contact Cipafilter support to get it imported.
3. Make the Cipafilter Proxy accessible
Once you have these pieces in place, you will then need to make the Cipafilter's proxy accessible to the internet.
- Go to the Web Filtering page.
- Click on the Insert Remote-Filtering (1-to-1) Rule at the bottom of the page
- Click Save and Apply. This will create a new rule on your Cipafilter that looks like this:
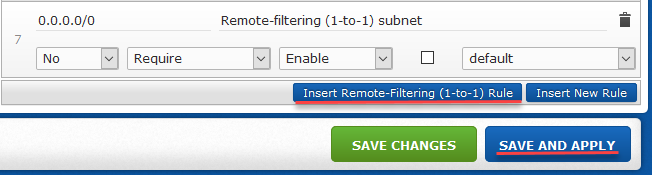
Important: You must require authorization on this subnet rule. If not, your proxy will be freely accessible to the internet and traffic from your public IP will start to become blacklisted by various ISPs. This is set to required by default.
Warning: Do not change the transparent proxy option from NO. Doing so will cause issues with connectivity. This is set to NO by default.
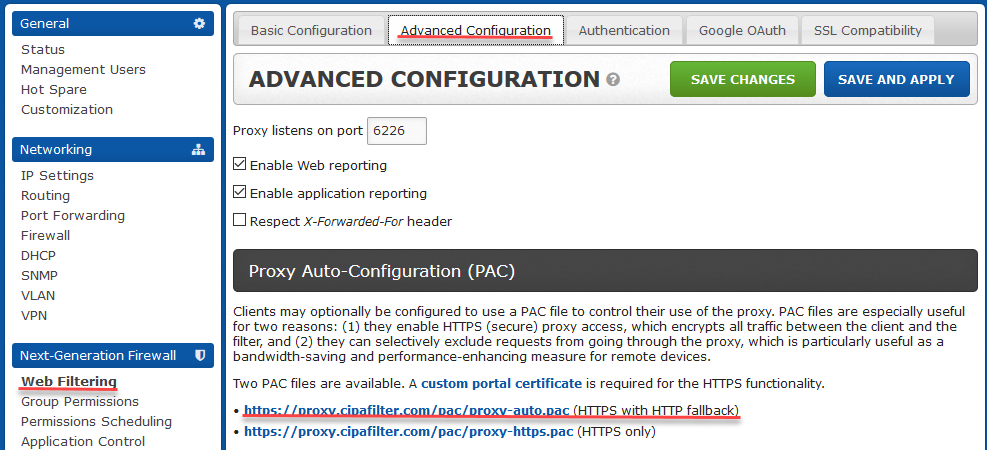
4. Verify Ports
Once you have your DNS set up, your SSL certificate generated and your proxy accessible from the internet, you will need to verify the port you are using for proxy services is open.
The filter's default proxy port is 6226, but you can verify or change this by going to Web Filtering > Advanced Configuration.
Info: We highly recommend using the default of 6226 or another port that isn't commonly used ( i.e. avoid 80, 443, 808, 1080, 3128, 8080, and 8118 ).
5. Distribute Proxy Settings
Finally, you need to decide how you are going to distribute your proxy settings to your clients. You can do so in one of two ways: Proxy Auto-Configuration (PAC) or via your management suite.
Proxy Auto-Configuration (PAC)
We recommend the use of a PAC (proxy auto-configuration) file for further customization and security. The PAC file will encrypt credentials sent via proxy requests, and gives you flexibility as a script based file that can be tailored to your needs.
The Cipafilter provides a PAC file template to be distributed to your devices under Web Filtering > Advanced Configuration. The URL to point your devices to is located here. We highly recommend using HTTPS with HTTP fallback. You can also configure options for DNS and proxy exceptions.
Management Suite Proxy Setting Distribution
Alternatively, you can distribute proxy settings via GPP, Google Admin, or your management suite. This method is not considered best practice, as it sends the users' credentials in clear text.